October 31, 2009

Spooky Broom

You all may have already seen this but I have to share it just in case you haven't and since it is Halloween......

Can your broom stand by itself? YES! and no I'm not crazy! I got an email from work yesterday of a photo of 2 brooms standing in the materials closet. I thought ha-ha, they have those tied up with strings or something for Halloween and I exited the email and continued working. A little later I get a call from the girls at the clinic and they are telling me that they have brooms standing all down the hall and that I should try it to show the boys.

So I tried it and this is my broom! Standing alone! It's been standing here since early this morning.
Photobucket
When I went to pick up my son I showed my aunt and she now has hers standing by her front door waiting for trick-or-treaters. Her brother called me this morning to tell me he stood his up last night and it was still standing this morning.

If you do a search for brooms standing alone, you'll find that this has been happening recently and it is attributed to the magnetic pull of the earth this time of year or something like that.
Photobucket
All I know is it's a pretty neat Halloween trick and my kids loved it. Try it and see if it works! Stand it up and balance it, let it go slowly. It might take a few tries the first time. Once you have gotten it to stand up on it's own, it will be easier each time (until you use your broom to sweep then you have to do the balancing thing all over again).

Now go scare some little goblins!

October 30, 2009

I Love Fall!

The pumpkins, the gourds, the straw, the mums, the corn shocks, the leaves, the hayrides....
THE COLORS!
Photobucket
What do you love about Fall?

October 29, 2009

And the Winner(s) Are...

The Give Away prize, according to Randomizer.org, goes to Jessica at Country Whispers and then since I was feeling generous today I am adding 2 more cookbooks as additional give aways and they are going to Twyla & Lindsey at Two Crazy Crafters and Lindsey's Paper Scraps and Janet at Creative Writing in the Blackberry Patch and Writing in the Blackberry Patch.

I hope I got all those links right!

Winners please email me with your addresses through the "Contact Me" link in the right sidebar and I'll get these sent out the first of the week.

Thank you all so much for entering and for reading/following my blog. Stick around for my next give away! I have something Christmasy in mind!

Give Away Ending

My give away will end this morning at 9:00 Central so hurry! hurry! hurry!  I have some errands to run this morning so the winner will be posted this afternoon.

If you have not been over to vote for Suzanne at Chickens in the Road, please read this post she made today on her blog and take the time to vote.  She wants, needs and after reading her blog for several months, in my opinion, deserves this job! 

Here's a shortcut button to the voting booth!

Vote for Me
Good Mood Gig from SAM-e

I'll be back later this afternoon!  I hope you all have an awesome Thursday!  It looks like the sun might actually shine here today after several days of rain!

October 27, 2009

Smart Critters

I have had this feeder hanging for 4 days. I go down each day and shake a little feed out. The deer come and eat it, then stare at the plunger stick thing that makes the food fall out. All you have to do is barely bump it and it falls out but these deer apparently think it's going to do it all by itself OR.....

They might get this smart little guy to help out!
I love the way he figures this out in about 2 seconds then the deer comes and eats what he has worked so hard for!

Photobucket

Photobucket

Photobucket

He knocked out a couple pieces of corn. He looks so excited here!
Photobucket

Gotta go back up and make more fall!
Photobucket

Oh yeah, that's more like it!
Photobucket

Hey wait a minute! Get outta here!
Photobucket

Gotta start all over!
Photobucket

Photobucket

Photobucket

Oh and this little guy is smart too. He has it all figured out. His arms just aren't long enough!
Photobucket
Hope this made you smile today!

October 26, 2009

Creamy Potato Soup

This soup is delicious and hits the spot on a cold winter day. I got the recipe from a friend of mine at a get together a couple of weeks ago and I made it for the church hayride Saturday night. It was a big hit after getting off that cold wagon of hay!

My little one loves it. We had a few leftovers and he asked for "tater soup" 3 different times yesterday.

Creamy Potato Soup
8-10 potatoes
1 tsp garlic salt
1 can cream of celery
2 cans cream of chicken
1 stick butter
1 (8 oz.) pkg. cream cheese
1 soup can milk (or evaporated milk) per can of soup
Salt
Pepper

Peel, chop into cubes and boil potatoes with garlic salt until tender. Combine soups and 3 cans of milk with butter and cream cheese. Stir on low heat until melted and blended. Gently stir in potatoes and simmer until thoroughly heated. Salt and pepper to taste. I like to put this in the crock-pot for family dinners so it stays nice and warm while it's being served.


Don't forget to enter my give away!

And vote for Suzanne over at Chickens in the Road!

October 25, 2009

Took a Drive

yesterday and the colors are absolutely gorgeous this year. We have had enough rain to keep things from just drying up, turning brown and blowing away. There's no way to capture the beauty on film/disc but I had to at least try.

These were taken on our road out to the main highway.
Photobucket

Photobucket

Photobucket

This is a pic of one of the bluffs on the way home from town. They are absolutely gorgeous when the sun hits them.
Photobucket
It was a beautiful day yesterday and we had our hayride and soup and chili supper at church last night. I love perfect Fall days!

Don't forget to vote for Suzanne today. She's almost in 3rd place already!

October 23, 2009

Give Away Link

Photobucket

Jessica at Colorado Crafter posted a comment to my give away which led me to her awesome blog, Colorado Crafter which led me to the Pumpkin Patch Primitive Quilt blog and I am so in love with her give away. I could do all sorts of things with that material (or the $100 gift certificate) but I had to tell you all about it to be entered so here goes:
Photobucket

Pumpkin Patch Primitive Quilt blog is having a VERY generous give away! Go here to check it out and enter!

Don't forget to check out my give away too!.

October 22, 2009

Sit Back and Relax Give Away

Photobucket


My boys have been sick with colds so I haven't been blogging in the last couple of days. What better way to redeem blogger slacking than to have a give away?

Both boys are better and back in Kindergarten and at the sitters so I am calling this the "Sit Back and Relax" Give Away!

It includes one of my cookbooks, a Nora Roberts romance novel (Cordina's Crown Jewel-it's not new, it's a hand-me-down), a rooster coffee mug and 3 little Fall scented candles.

You can put on an easy crockpot recipe from my cookbook, grab a cup of coffee or hot cocoa, light your candles and sit back, relax and read for awhile! That's my idea of relaxing, I just can't seem to find the time to actually do it!

All you have to do to enter is tell me what you do to relax when you can sneak a few minutes away from the hustle and bustle of life!

If you post about the giveaway on your blog, leave me an additional comment with a link to it and I'll give you another entry.

Give Away will end in 1 week October 29th at 9:00 a.m. Central time!

October 20, 2009

Vote! Vote! Vote!

I am sure most of you already read Suzanne McMinn's awesome blog Chickens in the Road, if not, you should! Go check it out! I read her blog daily and it is one of the blogs that inspired me to start my own. She is in a talent search to be the SAM-e good mood blogger. You can read about it here. Then, follow the link on her page or click the button below to vote for her (you can vote once a day). She really wants this job and I think she would be great at it.

Vote for Me
Good Mood Gig from SAM-e


Thank you!

October 17, 2009

How to Make a Rustic Suet Feeder

Pumpkins and suet seem to be the themes around here lately. I have a bought suet feeder on my back deck that the birds absolutely love. The titmice and nuthatches are constantly pecking away at it and I have had bluebirds and woodpeckers visit it as well. I wanted one for my front porch but didn't want to pay for another suet feeder when it looked so easy to make. It was easy! Here's how I did it and I had all this stuff out in the tool shed.

Here's what you need:
*A piece of wood no longer than 1 1/2 feet if you plan on hanging it, about 3 to 4 inches in diameter
*One eyelet screw
*Drill
*1 1/2 inch drill bit
*5/16 inch drill bit
*3 ft. piece of wire
*Twigs from your yard
*Garden shears (or something to cut small sticks)

Photobucket
Take a piece of wood. I just pulled a piece from our wood pile that we stacked up when we did the clean up from the ice storm last January. Make sure the ends are flat if you want to mount it on your deck rail or a post instead of hanging it up.

Photobucket
Begin by drilling 3 of these 1 1/2" holes equal lengths apart down one side of the log.

Photobucket
Make them about an inch deep. You want a good seat for your suet but not deep enough that you'll drill all the way through when you make the holes in the other side.

Photobucket
When you get your 3 holes drilled, rotate your log 1/4 turn and drill 2 holes between the 3 you just drilled.

Photobucket
Rotate and repeat the 3 and 2 again. You will have a total of 10 holes when finished.

Some people put the hanger on and leave it like this so the woodpeckers and nuthatches can hang from the bark and eat but I like to spoil my birds and make it a bit easier for the little guys like the chickadees and titmice to get a tasty meal. Take your 5/16" drill bit and drill holes 1 to 1 1/2 inches below the large holes. Make these about 1 inch deep.

Photobucket
Now screw the eyelet hook in top. You might want to use a bit larger one than this. I just happened to have this size in the tool box.

Photobucket
Cut a piece of wire about 3 feet long and double it a couple of times, run it through the hook and then twist, twist, twist. You want it to be about 4 inches long, any longer and the feeder will swing and cause your eye hook to loosen.

Photobucket
Now, grab your feeder, tuck it under your arm and go on a walk-about!
You could buy wooden dowels to cut and insert into the small holes but I think twigs/sticks from your yard make it look much more rustic (and they are free).
I carried my suet feeder around grabbing sticks and inserting them into the holes. If they aren't quite snug you can add a drop of Elmer's glue in the hole then put them in. My boys used all my glue so I just made sure to find ones that fit snugly. Don't worry if they are too long just make sure they have a straight spot that will be the perch for your feathered friends. Mine sort of looked like it had a bad hair-do by the time I was finished stuffing in the sticks.

Photobucket
Now, go to your garage and rummage for those hand clippers in the toolbox and on the shelves. I don't have a pic of mine because I never found them. I borrowed my husband's big limb loppers and carefully cut each of my perches of to about 1 1/2 inches.
Then, I stuffed each hole with some of my homemade suet. You can make this and when it cools, roll it into balls that will fit in the holes.

Photobucket
and there you have it, a rustic suet feeder to hold wonderful goodies for your birds all winter long.
And something you can be proud of because you made it all by yourself!

Photobucket
Supper's ready! Come and get it!

October 16, 2009

Pumpkin Pie

Photobucket
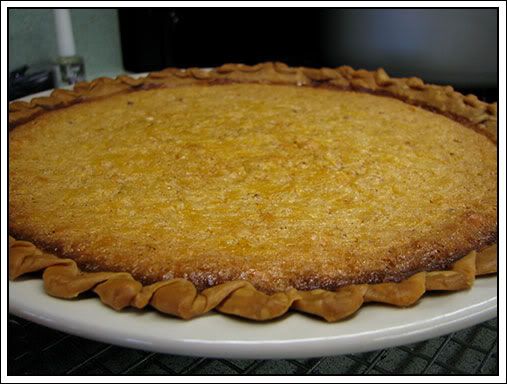
I made this pie from the pumpkin I was freezing a couple of days ago. I will be making more of these on Thanksgiving! They were so good!

I have to give credit where credit is due. After searching several pumpkin pie recipes I found this one from Paula Deen and once again she did not let me down. I've thrown in a few side notes of my own.


Pumpkin Pie
1 (8 oz.) pkg. cream cheese, softened
2 cups of canned pumpkin (but please buy a pumpkin and make your own - it's so easy and it will make you feel so domesticated - you can brag that you made it from scratch using your own pumpkin).
1 cup sugar
1/4 tsp. salt
1 egg plus 2 egg yolks, slightly beaten (thanks to my hens I've been freezing 3 to 4 eggs at a time in little freezer containers for the winter when they decide to be lazy)
1 cup half-and-half (I didn't have half-and half - so I used goat's milk - I love having fresh goat's milk)
1/2 stick melted butter
1 tsp. vanilla extract
1/2 tsp ground cinnamon
1/4 tsp ginger, optional
1 piece pre-made pie dough (I admit I used bought on this one but next time I promise to make my homemade crust).
Whipped cream for topping (We prefer Cool-Whip!)

Preheat oven to 350 degrees F.

Place 1 piece of pie dough down in 9-inch pie pan and press down along the bottom and all sides. Tug, pinch and crimp your edges to get a pretty pattern. You can put your pie shell back in the freezer for 1 hour to harden back up or I already had mine cold in the fridge so I went ahead and used it right then. I am trying to use the Paula Deen instructions because it's her pie but I always change a few things when I'm baking! Line the pie shell with aluminum foil and fill with pie weights or dried beans (I used a microwave safe saucer to sit down in the pie shell and it worked just fine.) Bake for 10 minutes, remove foil and whatever you used to weigh it down and bake for another 10 minutes. This keeps the crust from getting all soggy.

For your filling, in large mixing bowl, beat cream cheese with a hand mixer. Add pumpkin and beat until combined. Add the sugar and salt, beat until combined. Add the eggs mixed with yolks, half-and-half and melted butter and beat until combined. Then add vanilla, cinnamon and ginger and beat until well blended.

Pour the filling into the warm crust and bake for 50 minutes (took mine a little longer) or until center is set. Place the pie on cooling rack and cool to room temperature. (I like my pumpkin pie cold so I let it sit for awhile to cool some and then put in refrigerator to finish cooling). Cut and top each piece with a big ole dollop of whipped cream or Cool-Whip topping and ENJOY!


This recipe is long and I think that tends to scare people away when they see a long recipe but it really is easy and the end result is awesome. I have shortened it a bit in the printed version. If you have access to pumpkins, try the homemade! If not, I bet the canned version is awesome too!

Photobucket
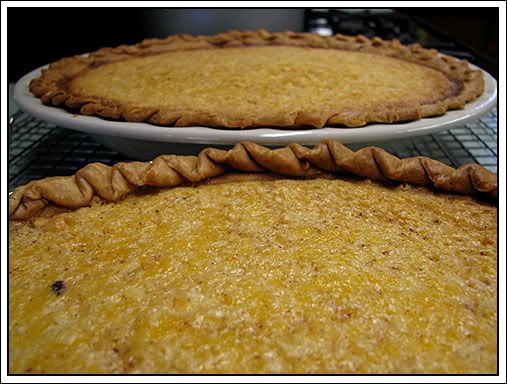
Speaking of two....well I doubled, made two and sent one to my mom and dad...they loved it!
Thank goodness I got pics of then because they were gone...fast!

Photobucket
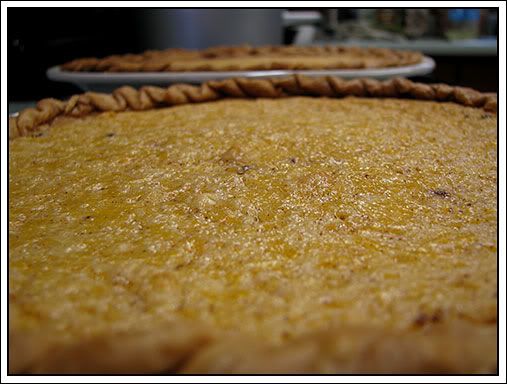
I love pretty pies all lined up on the counter cooling!

October 15, 2009

Freezing Pumpkin

Fall just wouldn't be right without a pumpkin pie, pumpkin roll, pumpkin bread, fried pumpkin......I love pumpkin! We bought several pumpkins from an Amish patch last weekend. My mom and grandmother call these old hog pumpkins and say they make the best pies. I have never made any of the aforementioned recipes with anything but canned pumpkin bought from the store before but since I have started blogging, I'm, always looking for something new to try and blog about.

So here's my journey from pumpkin to freezer to pie!
Start with a large pumpkin. I'm sure any kind will work but I'm using the light orangish-yellow ones. Wash it well.

Photobucket
Cut in half crosswise and scrap out all the strings and seeds better known as "the guts" around here.

Photobucket
Lay the pumkpin shell up on a large cookie sheet/pan with sides because it will produce a lot of juice while it's baking. Bake at 350 degrees for approximately 1 hour or until the shell starts to collapse when pushed on.

Photobucket
Remove from oven, invert on a strainer for an hour or so while cooling (thanks for that tip from Paul at Salt Creek Life) so your flesh will not have so much juice in it. Flip it over and the inside will be soft and juicy.

Photobucket
Scrape the inside of the pumpkin from the peel. I have found this very easy to do with a spatula to hold the peel and one of those pumpkin scrapers from the jack-o-lantern kits to scrape with. Larger pumpkins may have a bit stringier flesh. Just give it a quick mash with a potato masher after you have scraped it from the peel.

Photobucket
I got 10 cups of wonderful pumpkin from this medium-sized one.
Look at that beautiful color and my house smelled so good from just baking the pumpkin.

Photobucket
I used 4 cups of this to make pies and a put the rest in 2 cup amounts into freezer bags, let cool completely and placed in freezer.
Photobucket
I have 3 more larger pumpkins just like this one and plan to freeze them also. This is so easy to do and tomorrow......I'll share the pie I baked.......yum!!!!

Country Whispers Give Away!


If you are a cross-stitcher or know someone who is go on over to Jessica's blog, Country Whispers and enter her give away contest!

October 14, 2009

The Pumpkin Patch

I just love going to the pumpkin patch in the Fall and seeing all the spectacular colors! It was even more fun this year because Luke and I got to go with Jake's kindergarten class on their first field trip!

We went to Wurth Farms. We all loaded onto a wagon for a hayride and made our way to the pumpkin patch.
Photobucket

Photobucket
Along the way we saw
spiders
Photobucket
a graveyard
Photobucket
a mummy
Photobucket
and a VERY colorful Frankenstein cow!
Photobucket
and lots of other scary things!

The kids loved running amongst all those big orange jacks!
Photobucket
The boys actually found time to stop and get their pic made with me!
Photobucket
This is Jake and his best friend Luke.
Photobucket
My little one and the giant pumpkin.
Photobucket
I thought this wagon and cornstalk horse were amazing!
Photobucket
and how would you like to camp out in one of these?
Photobucket
We had a great time! Jake attends a private school and here's his kindergarten class with his teacher Miss Sara and her baby girl Madison.
Photobucket
and here's the whole gang (First grade, Kindergarten and a couple of tag alongs (Luke and his friend Gabe)!
Photobucket
Thanks for going on our pumpkin patch trip with us!!

ANNOUNCEMENTS

For those of you who are new followers/readers, don't forget to check out the forum and join in on our discussions there.

My Country Blog of This and That Forum

I love each and every comment my blogging friends leave for me!


All images and graphics on this page were made by me with the exception of that little rooster! He came from Beth Logan's Checkered Chickens at pccrafter.com. Photos were taken by me and graphics were created using Photoshop CS2.
If you see something you like please ask for permission before using it!
Thank you!