


Strawberry and Blackberry Homemade Yogurt
Homemade yogurt is so easy to make! I have tried two different methods and if I'm not in any hurry I use the regular Crockpot method. If I am in a hurry to get things going, then I use the "quicker" method!
I like to make this yogurt right before I go to bed so it has a full night to sit and incubate. By morning, I have wonderful thick yogurt ready to be chilled.
Ingredients for the regular and quick method are both the same.
Here's what you will need:
2 quarts milk
1 cup of dry powdered milk
1 cup plain yogurt with active live cultures listed on the label (otherwise it won't work)
Thermometer
2 Tbsp. jam or jelly (optional)
Notes:
*I use fat-free milk from the store if we aren't milking the goats - any milk will work.
*You do not have to use the dry milk but it makes a thicker, much nicer yogurt consistency.
*I use Dannon for my first batch then I use the yogurt I make as my starter from there on out.
*If you don't have a thermometer you can bring the milk almost to a boil for the 185 and when you can hold you finger in the milk for 10 seconds without burning for the 115 but this is iffy...if the milk is too hot, you kill the live cultures and your yogurt won't thicken.
Regular Crock-pot Method
-Add 2 quarts of milk and 1 cup of dry milk to the Crock-Pot and stir well
-Turn Crockpot on, cover with lid and heat your milk up to 185 degrees. This takes about 2 hours.
-Turn the crock-pot off and remove the lid
-Let cool to 115 degrees. This takes about 2 hours.
-Add 1 cup of plain yogurt and stir well.
-Wrapping and incubating: Replace the lid and wrap the crock-pot in 2 or 3 towels. You can leave it on your counter if your house is fairly warm. I sometimes sit it inside my oven to make more room on the counter top. The yogurt needs to stay between 90 and 110 degrees during this time. Let sit for at least 6 to 8 hours, up to 10 for a thicker yogurt with a stronger taste.
Quicker Method
(for getting it into the Crock pot before bedtime!)
-Place the insert in your Crockpot and turn it on low to get warm.
-Add 2 quarts milk and dry milk in a saucepan on the stove.
-Heat to 185 degrees.
-Remove from heat and pour into the pre-warmed Crock-pot. Turn Crock-Pot off. This skips the 2 hour heating step. I still like using my Crock pot because it's a good size for making yogurt. Any container that can be covered and wrapped up will work including the saucepan you just used, it just takes longer to cool down. I have been known to add a couple of cubes of ice at a time to cool this down . Keep a close eye on your temp while doing this (this cuts out the 3 hour cooling down step) but you might want to increase the amount of dry milk you added at the beginning to make up for the water this adds.
-Follow the steps above for wrapping and incubating.
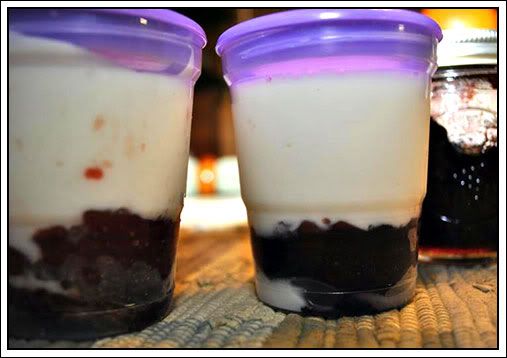
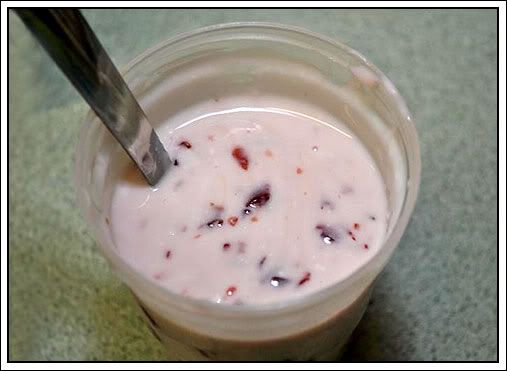
You should now have homemade yogurt!!! Put in a large container or in individual one cup serving containers and place in the refrigerator to chill. I add 1 to 2 tablespoons of jam or jelly per 1 cup of yogurt, stir and enjoy. It's delicious and much cheaper than store bought. Remember to reserve 1 cup of plain yogurt as a starter for your next batch! The starter can be frozen or is good in the refrigerator for 1 to 2 weeks.
YUM! Blackberry! I can extra jams and jellies just to use in yogurt each year!
There are many ways to incubate your yogurt. You can sit your saucepan on on a towel-covered heating pad on low and cover with another larger upside down pot, put it in a toaster oven set to 100 degrees, regular oven with just the pilot light on for heat, in a cooler lined with towel......those are just a few I have read about.
So far this week my son has had strawberry, peach, blackberry and plum yogurt for breakfast. I like to throw a packet of Splenda in mine and have it that way. You can add a little sugar and vanilla to the milk in the beginning if you like to give it a hint of sweet vanilla taste. Let me know if you have other variations on homemade yogurt. I would love to hear them!


9 comments:
Mmmm....that looks so good!
Happy Weekend to you.
-FringeGirl
I just saved your recipe and am super excited to give it a try - as we eat a lot of yogurt in this house. Thanks for sharing!
'hugs from afar'
I love the homemade yogurt. I buy the culture from Hoegger Goat Supply and have a yogurt maker because I'm not talented enough to keep the temperature consist any other way. Looks yummy!
It sure looks good. :)
I may have to give it a try sometime.
You make the best things my friend..YUM! I have had trouble with my wrist, so I don't go around commenting on all the blogs but those who come visit me, I will go and visit them. So good to hear from you ;D
I'm starting to get a craving for homemade yogurt again. I might have to try your recipe. It makes a smaller batch than mine and I sometimes have trouble eating through all of mine.
tsmith
Is there a limit to how long you should leave it covered? Can I leave it longer if it is not thick enough in 12 hours? My first batch didn't turn out very well and wondered if I could have left it longer.
I have read that some people leave it out up to 36 hours but I'm not sure I would want to leave it for THAT long. I do know that the longer you leave it the more tart yogurt tasting it is. I have noticed that between the two methods above, I do get thicker yogurt from the longer crock pot method but not much. At least not enough difference to wait for the long one if I'm in a hurry to go to bed!
It's confirmed...you are incredible. I'm getting braver and braver and one of these days, I'm going to make my own yogurt--like a pro...like you.
:]
Post a Comment